22 Jan 2012

All copper and earth tones this week

I don’t seem to have been able to get my teeth into much new lately, all of my orders have been for re-makes of existing designs. Absolutely nothing wrong with that whatsoever, but you do get the creative itch to be doing something for the first time and my head is always bursting with ideas wanting to take form.

Lovely translucent oval Jade beads spiral wrapped in antiqued copper.

A young couple who have been my son’s closest friends, for what must be something like 10 years, asked me to make a necklace for his Mum (and she’s my friend too) for her birthday this week and wanted something in ‘earth tones’ for her. I showed them some designs and we honed it down to close to what they had in mind.

A smaller version of my spiral coils necklace – the coils are a slightly smaller gauge and shorter too – we thought that she might not suit the heaviness of the other ones I’d made, so I scaled it down a little. This one may well remain with me, I was promising to make myself one with some of these gorgeous blue green Indian Fancy Jasper lanterns.

But we were a bit up against it time-wise, so I suggested that I should make a few new pieces that fit their brief, from which they could choose the one they like best and the rest would simply be new stock for my shops.

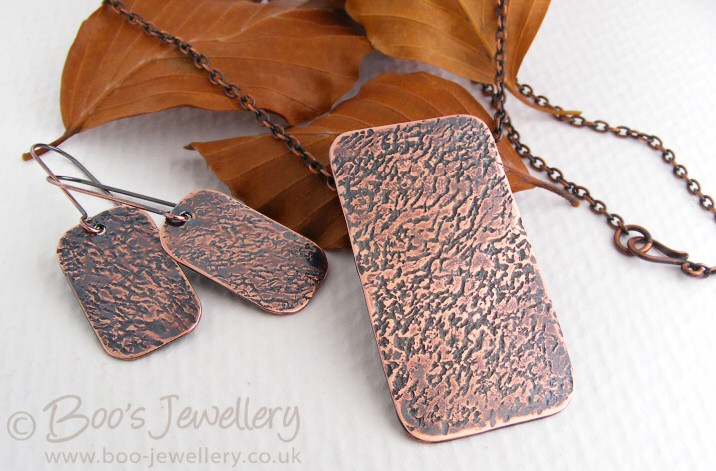
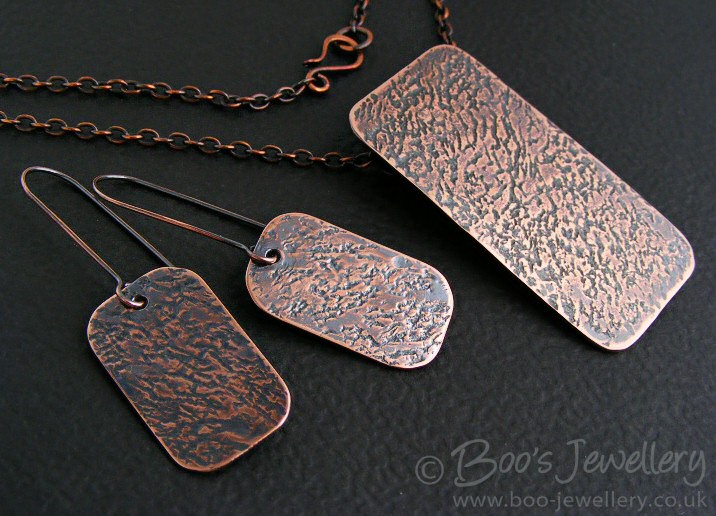
Whilst digging through my bead stash for ‘earth tone’ beads, I found several that I liked but were too small for the designs I had in mind, so I fancied the idea of one with leaves and berries, so this necklace features a random toning selection of copper and earth green leaves and berries. I intended it to be a short length in the centre of a collar length necklace, but wondered if a heavier central feature bead might cause it to fall into more of a V at the neckline, so added this large Rhyolite coin in the centre with some rosy copper buds above it.

I’ve found that it’s often quicker to work that way than try and thrash out all of the details before picking up the tools – just depending on the nature of the piece they want and how fixed the customer is in their ideas – and how many ideas I have!

Once I got into the zone for the colours and style they wanted, the ideas quickly flowed and I ended up with the 4 designs shown here for them to consider, which thankfully they liked well enough that they were stuck to decide and did indeed go for the one I had placed my little personal wager on.

The necklace they chose; with Indian Fancy Jasper lantern beads spiral wrapped between hammered copper washers.

They thankfully stated their preference a couple of days before they came to collect it, which gave me the opportunity to make a matching pair of earrings as my gift for her too.

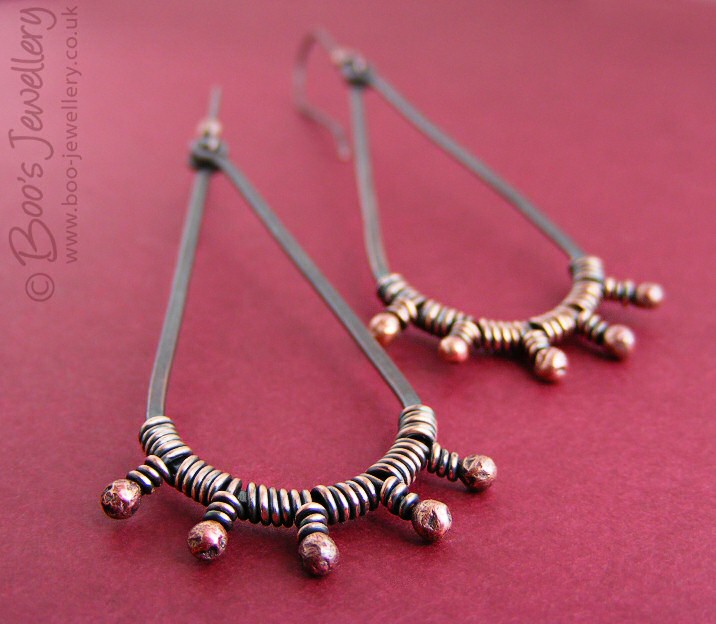
The earrings I made to go with them. She doesn’t often wear long earrings, so I wanted to keep them as short as possible, yet match the design, so I put them on a hammered paddle pin which allowed me to continue the spiral into a couple of wraps below the bead.

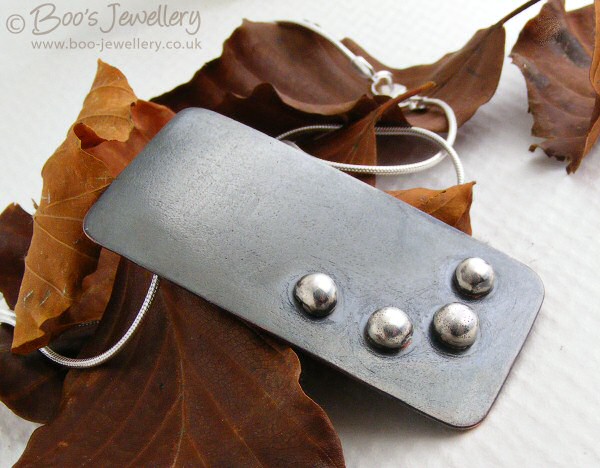
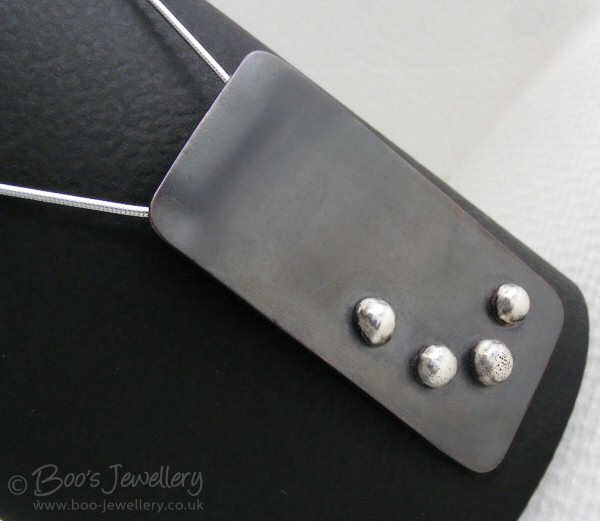
Talking of jewellery gifts reminds me to include a bracelet that I made for a Christmas gift – it was a variation of one of my standard and regular selling designs; a solid copper double wrapped link antiqued bracelet – which I normally close with a large hook clasp. In this case, I felt the recipient might struggle to fasten the clasp on her own, so opted for a toggle clasp instead.

There’s clearly more time and work in making the toggle, which would certainly increase the price, but I think I might add this variation to my shop too. In fact, when I am more flush and can justify using the materials for myself, I’d like one like this in Sterling silver, I think it would make a good everyday ‘go with anything’ bracelet that would be easy to wear.

19 Jul 2011

This weeks fixation is . . .

Further to my last post about the new teardrop pendant I’d been working on, as often is the case, I get somewhat fixated with a design idea or technique and work several variants of it in short order.

Please click on any of the photographs for a larger view.

I don’t suppose for one minute that I’m any different from other designers in this respect – once you get attuned to working on something, your mind just runs away with it and the more you work, the more variants and ways you can use the element pop into your mind.


Thus is has been over the last few days. I’ve fine-tuned my method so that I can make them consistently and with a symmetrical shape and my head is full of ideas to work on – like it needed any more in there fighting for my attention.

The first photographs above are of what was the initial prototype I made from a soldered oval I already had on my bench. As the soldered join was a little untidy, I thought it might be nice to cover it with a molten silver nugget and make a feature of it. It was also quite small and didn’t have much weight to it, so this will help it hang nicely. I’m going to keep this one myself and as I almost always wear pendants on a Sterling silver snake chain, the silver nugget will co-ordinate with that.


I also made some larger copper teardrops, more in line with the shape of the silver one – which had been my intended shape all along. I kept one highly polished and plain like the silver and another I adorned with an internal squiggle with hammered molten button ends, wrapped to the outer teardrop frame and supplemented with a couple of wrapped tiny copper beads – antiqued to enhance the textures.

It perhaps isn’t evident from the photographs above, but the bails are at 90 degrees to the body of the teardrops , so that they hang perfectly perpendicular to the chain they’re on. I’d photographed at angles to show the twist between the two loops of the teardrop and bail eye, but it does sit straight and central to the body of the pendant. I’ll unfortunately have to leave my ideas for a day or two as I have other non-jewellery work to do.


Post script:

Famous last words above; I knew I wouldn’t be able to help myself. I had to wait for a client to get back to me today before I could complete some work for them and I was able to finish this further variation that I started a couple of days ago. I’ve done various pieces with rosebud knots in the past and seeing (at the time) a rosebud knot piece in the ‘I’m currently working on’ box on the right, I wondered if it could be combined with the teardrop shape – which would rely on the knot retaining its shape whilst I made the pendant shape above it – which places quite some forces on the metal.

Thankfully, in this gauge of wire, it did and I was thrilled to bring two of my favourite recent techniques together. Even as I write that, I have a further idea to bring the teardrop together with another of my often used techniques – so it’s off to the sketch book yet again.

This version is made from a single length of heavy copper wire, which hasn’t been soldered in this instance, the knot holds it together.
11 Dec 2010

All tied up in knots

I’ve blogged several times in the past about how working on one thing takes you down a particular design path – how one idea leads to another and you produce a series of related pieces, often on a theme. Thus it was this week. A returning customer asked me to make a pair of earrings for her that were an amalgamation of two designs already available in my shop – she liked one element of each design and wanted them combining.

Thankfully, with my recent discipline of keeping a detailed journal of my designs with sizes, gauges of wire used and the tools and methods I’d used to make a particular shape, I was easily able to re-create the elements in question, faithfully to the original design and without the very frustration that led me to that practice in the first instance.

Please click on any of the photographs to see a larger view.

The custom earrings I made this week – using the double looped rosebud knot, but with rosy buds at the bottom, where the originals had a wrapped stone dangling.

Once you’ve torn your hair out trying to re-make an old design and not been able to get it quite the same as the original, you realise the real value in disciplining yourself to maintain such records religiously. It was with some degree of smugness that I first flipped the pages to find my design ‘recipe’ for something I needed to re-make and a practice that has proven itself time and time again. The fact that my husband gave me a lovely leather bound book for just this purpose last Christmas has made it a particular pleasure to work in.

When I work, I always jot down the length of wire I cut and the diameter of any turns or loops and if I find I have too much waste, or struggle to finish the shape with too short a piece, I make the adjustment in my notes too. If I find that a particular method doesn’t work and I find working from the back, or anticlockwise, for example, cures a problem or gives rise to a better shape, then this is also noted.

Whilst fiddling with my double looped knots, I wondered how well they would work as a single loop with a rosebud knot at one end and I rather liked the results.

We’ve all done it, had problems making something, found a solution, then come to remake it some time later, fall into the same initial difficulty and can’t remember what we did to cure it the first time around. So my journal is used to note all such details, with sketches and diagrams where appropriate. I even note which tools I used if I found that one item worked better than another.

Having made a single loop pair of earrings (above), I wondered how heavy I could go with the wire and made this pendant in 1.6mm (14 gauge) copper wire. The loop is just over an inch (27mm) in diameter.

I’ve got into the practice of making scribbles on scraps of paper or in my sketch book as I work, which I treat much like we did with a ‘rough book’ at school – I do all my working out in that, then transpose my final version (which may have been amended or adjusted several times by the time I’m done) to my neater finished journal – so that it’s hopefully easier to make sense of at some time in the future.

The matching set of rosebud knot loop pendant and earrings. I’ve oxidised the copper pieces and then tumbled them extensively to get a nice gunmetal colour on the dark areas, then polished just the rosebuds back to highlight them.

I tend to sit down after breakfast, whilst I finish my coffee, before the day starts to veer away from my intended plans, and transpose all my scratty notes into the journal before I lose them, or lose my train of thought. The investment of time in doing this has proven well worth it on many occasions. I also have this thought in the back of my mind that at some time a long way in the future, my great-grandchildren may find it a fascinating treasure the same way that I do my grandfathers old sketch book – a little glimpse into my life at this time.

Now I was on a roll I wanted to see how they’d look in Sterling silver. I didn’t have the same gauge of wire, so these are a little more delicate than the copper version of the earrings, but I decided to leave these as shiny silver, rather than oxidise them.


And so it was this week with these custom earrings. I consulted my design journal to make the same knotted loop element again and once my fingers had remembered the technique required to get a nice even knot, I set about making several other pieces using the same elements, as above. Once you start with something, your mind just takes you where it will and I still have ideas left to try using the same techniques.

27 Oct 2010

Recent work in progress, now completed

I apologise for not making a very meaningful post, but as I’m going to be out of action for a few days, I thought that I’d bring you up to date on some of the work I showed previously in progress. I’m always interested to read other jeweller’s methodology when coming to a design, so thought I’d add some background on my own pieces.

Unfortunately some of the pieces I’d like to show you, that are responsible for quite a bit of my time recently, are custom items intended for gifts, so I need to keep them under wraps for the time being, I obviously don’t want to spoil any surprises.

I’ve been doing some work with copper sheet and showed two pendants in their finished but raw metal state. I’ve now oxidised them and decided upon a final finish.

The pendant and earring set shown below was cut from copper sheet and given a hand finished texture. Then shaped and polished and the smaller pieces drilled for the earwires and a tube bail soldered to the back of the pendant – I wanted to keep the front of it plain without interruption from a jump ring or other bail structure.

Please click on any of the photographs for a larger view.

I gave the upper surfaces a high degree of hand polished shine so that once oxidised, it would take on a nice gunmetal style sheen. I polished the oxidisation back a little from the surface to reveal the texture.

I’d originally intended soldering solid earwire hooks to the back of the earring pieces, but decided at their size, they might hang a little low and without articulation. Coming up to winter when ladies are more likely to wear coats and scarves, it might cause them to get pushed upwards during wear, so I went for a long stright drop earwire through a drilled hole instead.

Seeing them finished this way I know it was the right choice, as they move nicely and the sheen on the surface gives rise to more interest as they jiggle in wear. But I think next time, I’d split the difference and solder a loop to the back of them and then attach that to an earire, to keep the front surface plain, as I’d originally intended – that didn’t occur to me until after I’d drilled the holes.


I posted earlier that this particular pendant had proved troublesome – sometimes the plainest looking designs need to the most work to keep them that way. I didn’t feel that the resulting finish was up to the standards I am happy with, so this one will be mine. I had given the front surface of the copper a brushed satin finish and wasn’t sure whether to oxidise, antique or leave raw. I do love the gunmetal sheen of highly polished copper when fully oxidised, so went with that option, tumbling it extensively to burnish the flat surface. I hand polished the Sterling silver nuggets to contrast against the darker background.

This pendant too has a tube bail soldered on the back and I think I’ll probably wear it on my Sterling silver snake chain. I like the simple contemporary lines of it and hope to apply what I learnt in making this one to something similar to sell.


These earrings aren’t a new concept for me by any means, I have made several pieces featuring these wrapped copper buds, but a customer wanted something long and dramatic, so these deep teardrop shapes were born – and I made an extra pair for the shop.

I’ve oxidised the earrings and then polished back just the wrapped areas to accent the texture there. The hammered teardrop loops have been left dark and smooth to contrast the textured details at the bottom. The buds were left a rosy copper and whilst these aren’t as red as some I’ve done, they still have a pink glow to them. I’ve hung them from wrapped earwires to mirror the texture.